How to Easily Deploy Apache Kafka on Kubernetes or Locally
May 1, 2024 in Cloud Optimization Strategies by Admirise Team
Deploying Kafka on Kubernetes or using Docker Compose provides flexible and scalable solutions for managing and orchestrating Kafka clusters. Kubernetes offers a robust and containerized environment suitable for production deployments, ensuring seamless scaling, resource optimization, and ease of management. On the other hand, local Docker Compose setups are ideal for development and testing purposes, allowing for quick, resource-efficient configuration on a single machine. Whether in a distributed cloud environment or locally for development, these deployment options empower users to harness the power of Kafka while tailoring the setup to their specific needs.
On Kubernetes Cluster
For brevity, some configurations are omitted. For a comprehensive and detailed set of Kafka deployment options, please consult the official Bitnami Helm Chart repo.
Go to your Kubernetes Cluster, then execute the following command to install Apache Kafka using the Bitnami Kafka helm chart:
helm install kafka oci://registry-1.docker.io/bitnamicharts/kafkaThis command will set up Kafka Brokers on the Kubernetes Cluster. This helm chart installs several Kubernetes resources including required Kafka service and stateful pods.
When the installation is finished Kafka Broker is accessible through kafka service. Clients within the same namespace can connect to this service with kafka:9092 TCP endpoint. Clients outside the namespace of Kafka Broker may connect it through
kafka.<kafka-namespace>.svc.cluster.local:9092 the endpoint.
You can check if the required services are installed with this command :
# specify the namespace you installed kafka in
kubectl get services --namespace default
If you observe services like the ones listed below, your Kafka setup on Kubernetes is ready to go. Otherwise, please review the configurations and commands above, paying particular attention to details such as namespace, Helm chart, and versions.
NAME                        TYPE           CLUSTER-IP       EXTERNAL-IP                                   PORT(S)                      AGE
kafka                       ClusterIP      10.105.147.230   <none>                                        9092/TCP                     20d
kafka-console               ClusterIP      10.101.153.191   <none>                                        8080/TCP                     20d
kafka-controller-headless   ClusterIP      None             <none>
Besides the Kafka services, please take note of the sasl.client.users and sasl.client.passwordsvalues in helm installation output on Kubernetes Cluster console. By default, the value sasl.client.users is set to 'user1' by Bitnami Helm chart. You can retrieve the password value from the client-passwords key in the kafka-user-passwords secret on the Kubernetes Cluster using the following command:
# specify the namespace you installed kafka in
kubectl get --namespace default secrets/kafka-user-passwords -o jsonpath='{.data.client-passwords}' | base64 --decode
Later, these values can be utilized in a microservice application’s configuration file, such as Spring Boot’s application.properties, to establish a connection to the Kafka broker using these key-value pairs:
# application.properties of Spring Boot Kafka Producer microservice
spring.kafka.bootstrap-servers=kafka:9092
spring.kafka.properties.security.protocol=SASL_PLAINTEXT
spring.kafka.properties.sasl.mechanism=PLAIN
spring.kafka.properties.sasl.jaas.config=org.apache.kafka.common.security.plain.PlainLoginModule required username="user1" password="*******";
On local Docker machine
Open your preferred text editor, copy and paste the content of the following kafka-compose.yml file, and save it.
# kafka-compose.yml
---
version: '2'
services:
  zookeeper:
    image: confluentinc/cp-zookeeper:latest
    environment:
      ZOOKEEPER_CLIENT_PORT: 2181
      ZOOKEEPER_TICK_TIME: 2000
  kafka-ui:
    container_name: kafka-ui
    image: provectuslabs/kafka-ui:latest
    ports:
      - "9000:8080"
    environment:
      KAFKA_CLUSTERS_0_NAME: dev-local
      KAFKA_CLUSTERS_0_BOOTSTRAPSERVERS: kafka:29092
      KAFKA_CLUSTERS_0_METRICS_PORT: 9997
      DYNAMIC_CONFIG_ENABLED: true
    depends_on:
      - "kafka"
  kafka:
    # "`-._,-'"`-._,-'"`-._,-'"`-._,-'"`-._,-'"`-._,-'"`-._,-'"`-._,-'"`-._,-
    # An important note about accessing Kafka from clients on other machines:
    # -----------------------------------------------------------------------
    #
    # The config used here exposes port 9092 for _external_ connections to the broker
    # i.e. those from _outside_ the docker network. This could be from the host machine
    # running docker, or maybe further afield if you've got a more complicated setup.
    # If the latter is true, you will need to change the value 'localhost' in
    # KAFKA_ADVERTISED_LISTENERS to one that is resolvable to the docker host from those
    # remote clients
    #
    # For connections _internal_ to the docker network, such as from other services
    # and components, use kafka:29092.
    #
    # See https://rmoff.net/2018/08/02/kafka-listeners-explained/ for details
    # "`-._,-'"`-._,-'"`-._,-'"`-._,-'"`-._,-'"`-._,-'"`-._,-'"`-._,-'"`-._,-
    #provectuslabs/kafka-ui
    image: confluentinc/cp-kafka:latest
    depends_on:
      - zookeeper
    ports:
      - "9092:9092"
      - "9997:9997"
    environment:
      KAFKA_BROKER_ID: 1
      KAFKA_ZOOKEEPER_CONNECT: zookeeper:2181
      KAFKA_ADVERTISED_LISTENERS: PLAINTEXT://kafka:29092,PLAINTEXT_HOST://localhost:9092
      KAFKA_LISTENER_SECURITY_PROTOCOL_MAP: PLAINTEXT:PLAINTEXT,PLAINTEXT_HOST:PLAINTEXT
      KAFKA_INTER_BROKER_LISTENER_NAME: PLAINTEXT
      KAFKA_OFFSETS_TOPIC_REPLICATION_FACTOR: 1
      KAFKA_JMX_PORT: 9997
Then execute the following command in the same folder as the docker-compose.yml file to set it up:
docker-compose -f kafka-compose.yml upThis command initiates a Kafka broker instance along with the kafka-ui offering visibility into topics and messages within the Kafka environment.
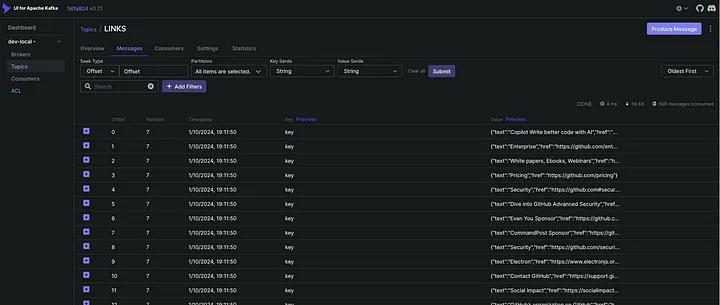
To explore your newly installed Kafka broker, open your preferred web browser and navigate to http://localhost:9000. As you develop producer/consumer microservices, monitoring live Kafka messages becomes convenient through this page.
For development purposes, no username and password are required to connect to the local Kafka broker, so these settings can be omitted in a microservice application’s configuration file, like Spring Boot’s application.properties, in the development profile below:
# application.properties of Spring Boot Kafka Producer Development Profile
spring.kafka.bootstrap-servers=localhost:9092
# to connect kafka-admin client of Spring microservice,
# security.protocol and sasl.mechanism are defined
spring.kafka.properties.security.protocol=PLAINTEXT
spring.kafka.properties.sasl.mechanism=GSSAPI
# username and password are left blank below for kafka-admin client to connect Kafka Broker
spring.kafka.properties.sasl.jaas.config=org.apache.kafka.common.security.plain.PlainLoginModule required username="" password="";
In summary, deploying Kafka on Kubernetes or using Docker Compose provides versatile and scalable solutions for managing Kafka clusters. Kubernetes, with its robust containerized environment, is well-suited for production deployments, ensuring seamless scaling and efficient resource management. On the other hand, Docker Compose setups offer a quick and resource-efficient configuration ideal for development and testing on a local machine.
For Kubernetes deployments, consult the official Bitnami Helm Chart repo for comprehensive Kafka deployment options. The provided Helm chart facilitates Kafka broker setup on the Kubernetes Cluster, making it accessible through specified endpoints.
If using Docker Compose locally, the provided kafka-compose.yml file enables the setup of a Kafka broker instance and KafDrop web UI for monitoring. For development purposes, connecting to the local Kafka broker requires no username or password, simplifying microservice application configurations.
Whether in a distributed cloud environment or locally for development, these deployment options empower users to tailor Kafka setups to their specific needs, offering flexibility and control over their messaging infrastructure.


